In this Spring Security tutorial, we will learn how to use Spring Security’s built-in Basic Authentication to secure REST APIs. Basic Authentication is a straightforward method for securing APIs by requiring a username and password for each request. This tutorial will guide you through the steps to set up Basic Authentication in a Spring Boot application.
Step 1: Create a Spring Boot Project
Using Spring Initializr
- Go to Spring Initializr.
- Fill in the project details:
- Project: Maven
- Language: Java
- Spring Boot: 3.2.0
- Group:
com.rameshfadatare - Artifact:
spring-security-basic-auth - Name:
spring-security-basic-auth - Package name:
com.rameshfadatare.springsecuritybasicauth - Packaging: Jar
- Java: 17
- Add the following dependencies:
- Spring Web
- Spring Security
- Click on the “Generate” button to download the project as a ZIP file.
- Extract the ZIP file and open it in your favorite IDE (e.g., IntelliJ IDEA, Eclipse, VS Code).
Project Structure
The project structure should look like this:
spring-security-basic-auth
├── src
│   ├── main
│   │   ├── java
│   │   │   └── com
│   │   │       └── rameshfadatare
│   │   │           └── springsecuritybasicauth
│   │   │               ├── SpringSecurityBasicAuthApplication.java
│   │   │               └── config
│   │   │                   └── SpringSecurityConfig.java
│   │   └── resources
│   │       └── application.properties
└── pom.xml
Step 2: Add Spring Security Dependency
To use Spring Security in the Spring Boot project, we need to add the following Maven dependency in the pom.xml file:
<dependency>
    <groupId>org.springframework.boot</groupId>
    <artifactId>spring-boot-starter-security</artifactId>
</dependency>
Step 3: Configure Spring Security
Next, let’s configure Spring Security to use basic in-memory authentication. Create a SpringSecurityConfig class under the config package and add the following code to it:
SpringSecurityConfig.java
package com.rameshfadatare.springsecuritybasicauth.config;

import org.springframework.context.annotation.Bean;
import org.springframework.context.annotation.Configuration;
import org.springframework.security.config.Customizer;
import org.springframework.security.config.annotation.web.builders.HttpSecurity;
import org.springframework.security.core.userdetails.User;
import org.springframework.security.core.userdetails.UserDetails;
import org.springframework.security.core.userdetails.UserDetailsService;
import org.springframework.security.crypto.bcrypt.BCryptPasswordEncoder;
import org.springframework.security.crypto.password.PasswordEncoder;
import org.springframework.security.provisioning.InMemoryUserDetailsManager;
import org.springframework.security.web.SecurityFilterChain;

@Configuration
public class SpringSecurityConfig {

    @Bean
    public static PasswordEncoder passwordEncoder() {
        return new BCryptPasswordEncoder();
    }

    @Bean
    SecurityFilterChain securityFilterChain(HttpSecurity http) throws Exception {
        http.csrf().disable()
                .authorizeHttpRequests((authorize) -> {
                    authorize.anyRequest().authenticated();
                }).httpBasic(Customizer.withDefaults());
        return http.build();
    }

    @Bean
    public UserDetailsService userDetailsService() {
        UserDetails ramesh = User.builder()
                .username("ramesh")
                .password(passwordEncoder().encode("password"))
                .roles("USER")
                .build();

        UserDetails admin = User.builder()
                .username("admin")
                .password(passwordEncoder().encode("admin"))
                .roles("ADMIN")
                .build();

        return new InMemoryUserDetailsManager(ramesh, admin);
    }
}
Explanation
- Password Encoder: The
passwordEncoder()method creates aBCryptPasswordEncoderinstance for encoding passwords. - Security Filter Chain: The
securityFilterChain()method configures HTTP security settings, disables CSRF protection, and sets up basic authentication. - In-Memory User Details: The
userDetailsService()method defines two users,rameshandadmin, and stores them in memory usingInMemoryUserDetailsManager.
Step 4: Create a Simple REST API
To test the above Spring Security configuration, let’s create a simple REST API and protect it using Spring Security.
WelcomeController.java
Create a WelcomeController class under the com.rameshfadatare.springsecuritybasicauth package and add the following code to it:
package com.rameshfadatare.springsecuritybasicauth;

import org.springframework.security.core.Authentication;
import org.springframework.web.bind.annotation.GetMapping;
import org.springframework.web.bind.annotation.RestController;

@RestController
public class WelcomeController {

    @GetMapping("/greeting")
    public String greeting(Authentication authentication) {
        String userName = authentication.getName();
        return "Spring Security Basic Authentication Example - Welcome " + userName;
    }
}
Explanation
- WelcomeController: This controller contains a single endpoint
/greetingwhich returns a welcome message along with the authenticated username.
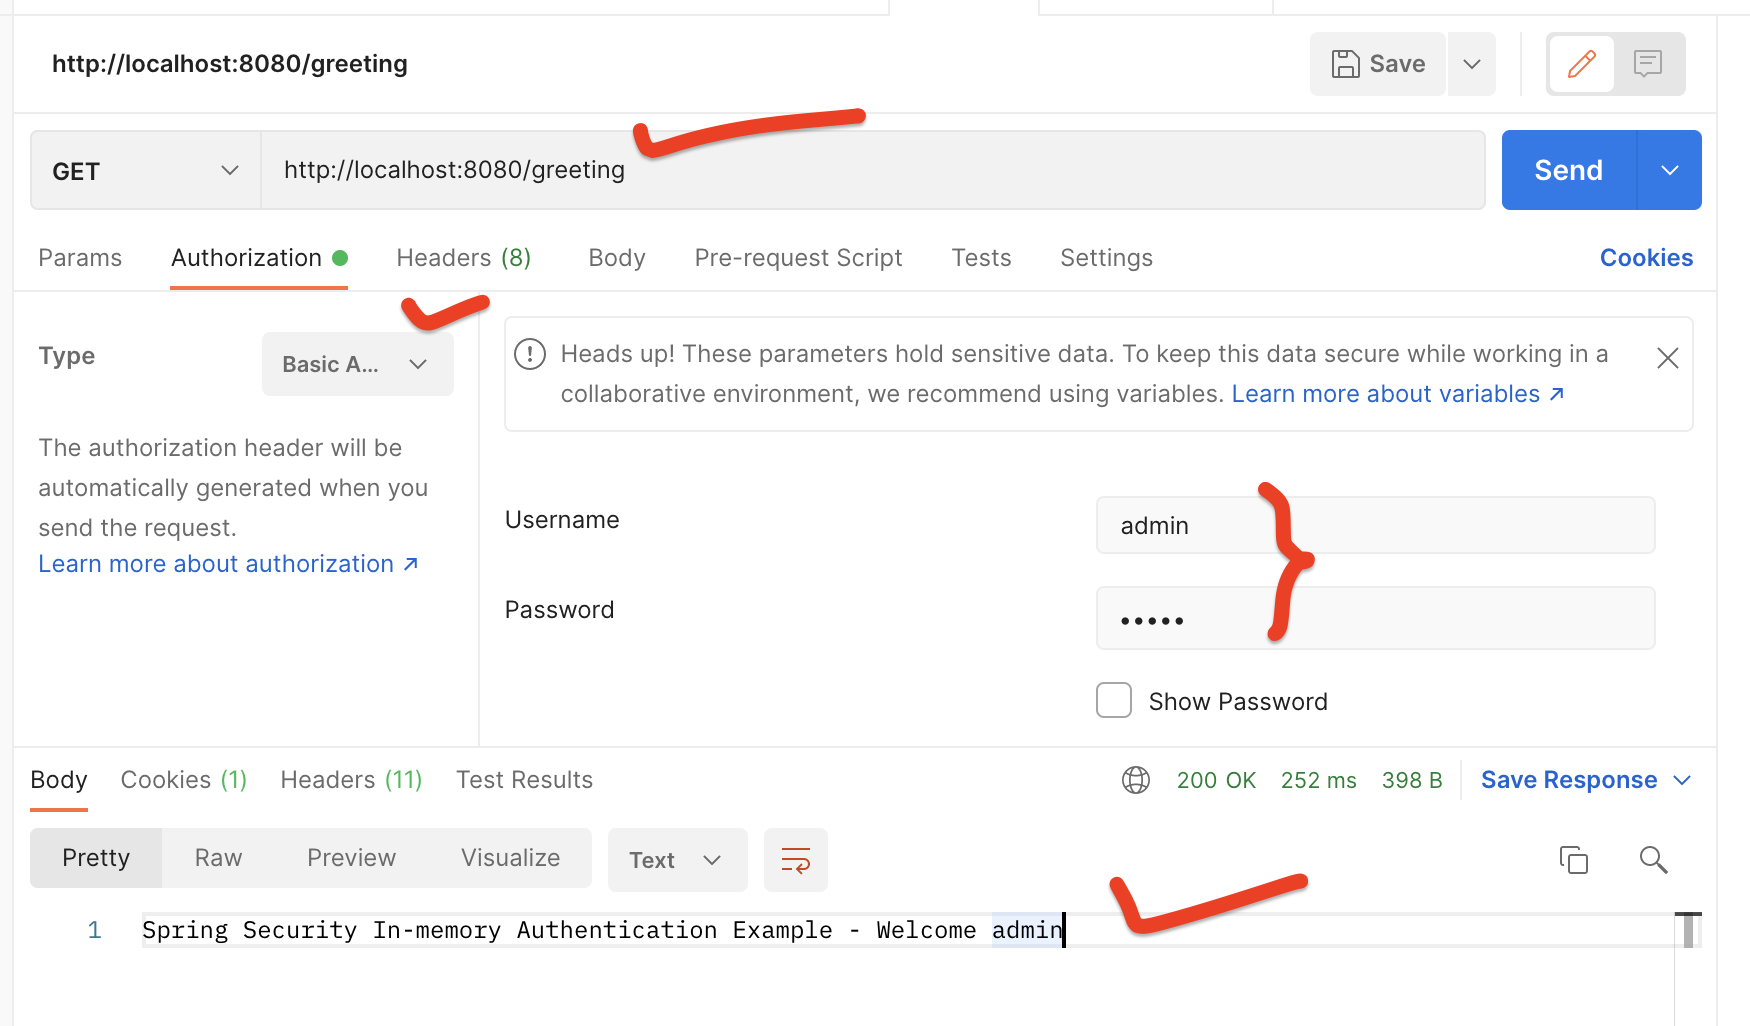
Step 5: Testing the REST API using Postman
To test the REST APIs, we need to pass a username and password in the header. This is called basic authentication.
Testing Steps
- Open Postman.
- Create a new GET request.
- Enter the URL:
http://localhost:8080/greeting. - Go to the “Authorization” tab.
- Select “Basic Auth”.
- Enter the username as
adminand the password asadmin. - Click on “Send”.
You should see the response: Spring Security Basic Authentication Example - Welcome admin.
If Authentication Fails
If we don’t pass the username and password, we will get a 401 status. This is how Spring Security secures the REST APIs.

Conclusion
In this tutorial, we have seen how to configure Spring Security’s built-in HTTP Basic Authentication to secure REST APIs. We have used the InMemoryUserDetailsManager class to store user details in memory and the BCryptPasswordEncoder class to encode passwords securely.