In this Spring Security tutorial, we will learn how to configure Spring Security to use in-memory authentication. In-memory authentication is a simple and efficient way to manage user authentication for small applications or for development and testing purposes. It involves storing user credentials directly in the application’s memory rather than in an external database. This method allows for quick setup and easy management of users without the need for database configuration.
By the end of this tutorial, you will have a clear understanding of how to implement in-memory authentication using Spring Boot and Spring Security, enabling you to secure your Spring Boot applications with minimal configuration.
Step 1: Create a Spring Boot Project
Using Spring Initializr
- Go to Spring Initializr.
- Fill in the project details:
- Project: Maven
- Language: Java
- Spring Boot: 3.2.0
- Group:
com.rameshfadatare - Artifact:
spring-security-inmemory-auth - Name:
spring-security-inmemory-auth - Package name:
com.rameshfadatare.springsecurityinmemoryauth - Packaging: Jar
- Java: 17
- Add the following dependencies:
- Spring Web
- Spring Security
- Click on the “Generate” button to download the project as a ZIP file.
- Extract the ZIP file and open it in your favorite IDE (e.g., IntelliJ IDEA, Eclipse, VS Code).
Project Structure
The project structure should look like this:
spring-security-inmemory-auth
├── src
│   ├── main
│   │   ├── java
│   │   │   └── com
│   │   │       └── rameshfadatare
│   │   │           └── springsecurityinmemoryauth
│   │   │               ├── SpringSecurityInmemoryAuthApplication.java
│   │   │               └── config
│   │   │                   └── SpringSecurityConfig.java
│   │   └── resources
│   │       └── application.properties
└── pom.xml
Step 2: Add Spring Security Dependency
In order to use Spring Security in the Spring Boot project, we need to add the below Maven dependency in the pom.xml file:
<dependency>
    <groupId>org.springframework.boot</groupId>
    <artifactId>spring-boot-starter-security</artifactId>
</dependency>
Step 3: Create Spring Security Configuration
Next, let’s configure Spring Security to use basic in-memory authentication. Create a SpringSecurityConfig class under the config package and add the following code to it:
SpringSecurityConfig.java
package com.rameshfadatare.springsecurityinmemoryauth.config;

import org.springframework.context.annotation.Bean;
import org.springframework.context.annotation.Configuration;
import org.springframework.security.config.Customizer;
import org.springframework.security.config.annotation.web.builders.HttpSecurity;
import org.springframework.security.core.userdetails.User;
import org.springframework.security.core.userdetails.UserDetails;
import org.springframework.security.core.userdetails.UserDetailsService;
import org.springframework.security.crypto.bcrypt.BCryptPasswordEncoder;
import org.springframework.security.crypto.password.PasswordEncoder;
import org.springframework.security.provisioning.InMemoryUserDetailsManager;
import org.springframework.security.web.SecurityFilterChain;

@Configuration
public class SpringSecurityConfig {

    @Bean
    public static PasswordEncoder passwordEncoder() {
        return new BCryptPasswordEncoder();
    }

    @Bean
    SecurityFilterChain securityFilterChain(HttpSecurity http) throws Exception {
        http.csrf().disable()
                .authorizeHttpRequests((authorize) -> {
                    authorize.anyRequest().authenticated();
                }).httpBasic(Customizer.withDefaults());
        return http.build();
    }

    @Bean
    public UserDetailsService userDetailsService() {
        UserDetails ramesh = User.builder()
                .username("ramesh")
                .password(passwordEncoder().encode("password"))
                .roles("USER")
                .build();

        UserDetails admin = User.builder()
                .username("admin")
                .password(passwordEncoder().encode("admin"))
                .roles("ADMIN")
                .build();

        return new InMemoryUserDetailsManager(ramesh, admin);
    }
}
Explanation
- Password Encoder: The
passwordEncoder()method creates aBCryptPasswordEncoderinstance for encoding passwords. - Security Filter Chain: The
securityFilterChain()method configures HTTP security settings, disables CSRF protection, and sets up basic authentication. - In-Memory User Details: The
userDetailsService()method defines two users,rameshandadmin, and stores them in memory usingInMemoryUserDetailsManager.
Step 4: Create a Simple REST API
In order to test the above Spring Security configuration, let’s create a simple REST API and protect it using Spring Security.
WelcomeController.java
Create a WelcomeController class under the com.rameshfadatare.springsecurityinmemoryauth package and add the following code to it:
package com.rameshfadatare.springsecurityinmemoryauth;

import org.springframework.security.core.Authentication;
import org.springframework.web.bind.annotation.GetMapping;
import org.springframework.web.bind.annotation.RestController;

@RestController
public class WelcomeController {

    @GetMapping("/greeting")
    public String greeting(Authentication authentication) {
        String userName = authentication.getName();
        return "Spring Security In-memory Authentication Example - Welcome " + userName;
    }
}
Explanation
- WelcomeController: This controller contains a single endpoint
/greetingwhich returns a welcome message along with the authenticated username.
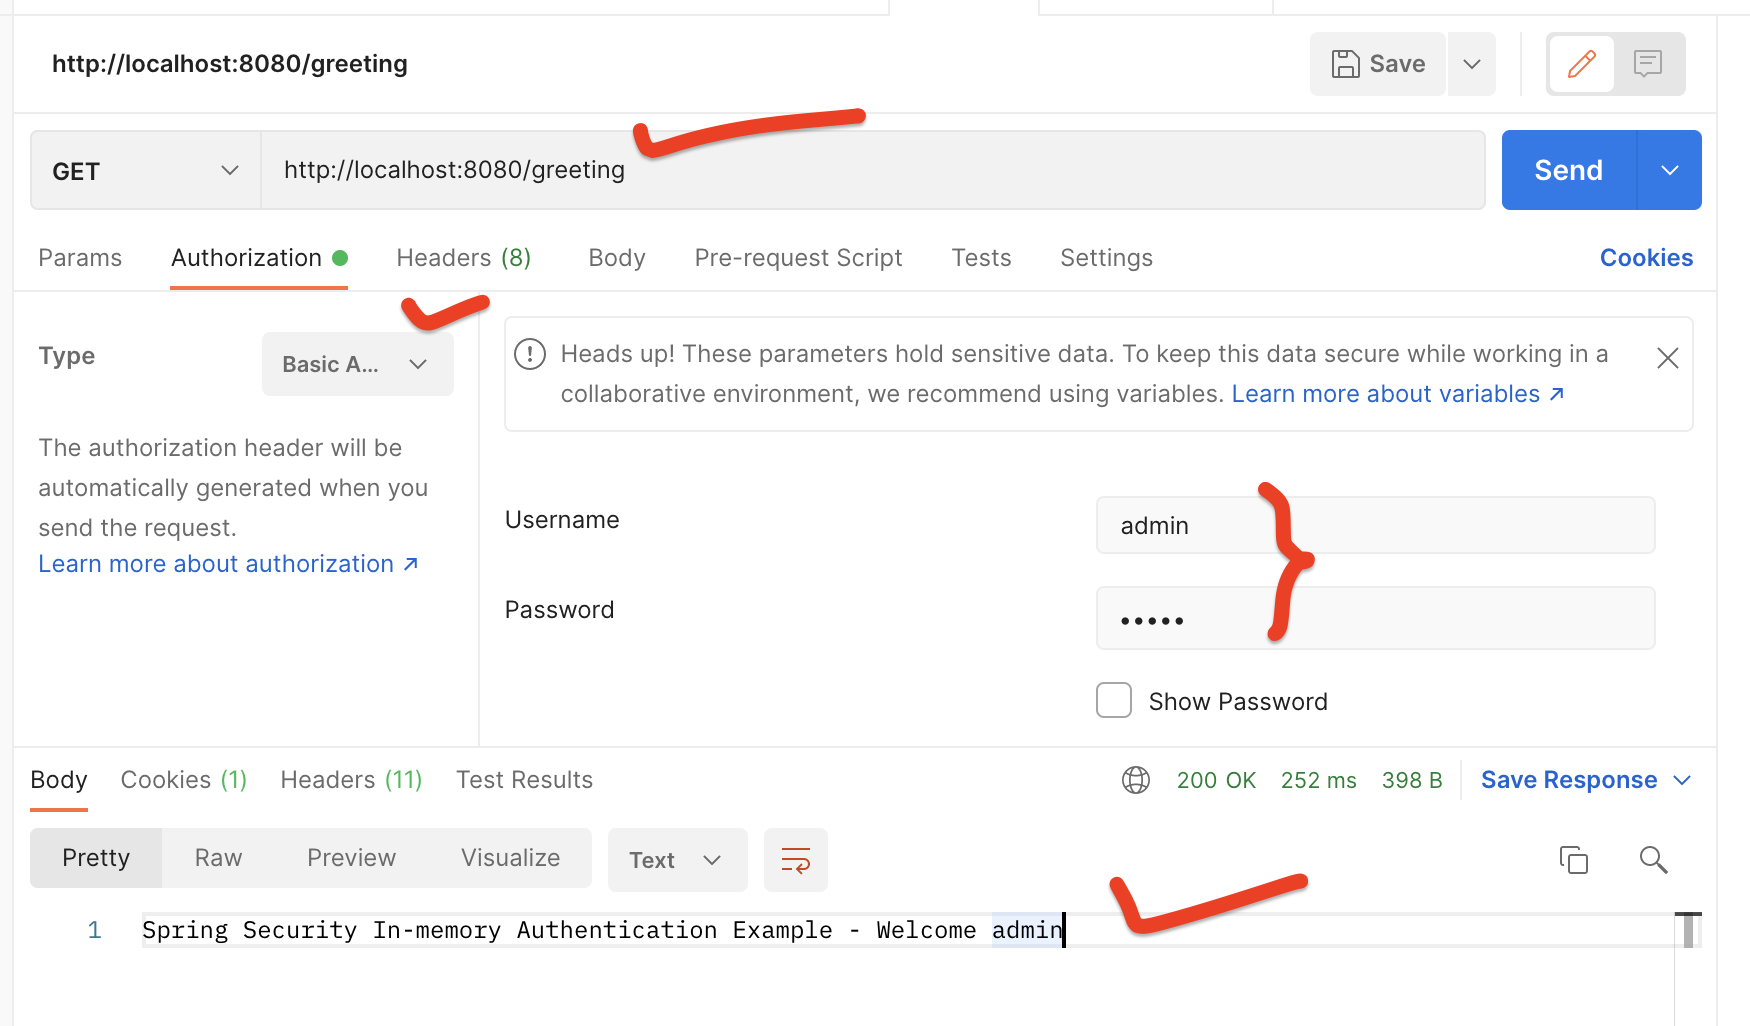
Step 5: Testing the REST API using Postman
In order to test the REST APIs, we have to pass a username and password in the header. This is called basic authentication.
Testing Steps
- Open Postman.
- Create a new GET request.
- Enter the URL:
http://localhost:8080/greeting. - Go to the “Authorization” tab.
- Select “Basic Auth”.
- Enter the username as
adminand the password asadmin. - Click on “Send”.
You should see the response: Spring Security In-memory Authentication Example - Welcome admin.
Conclusion
In this tutorial, we have seen how to configure Spring Security to use in-memory authentication. We have used Spring Security’s InMemoryUserDetailsManager class which implements UserDetailsService to provide support for username/password-based authentication that is stored in memory.